


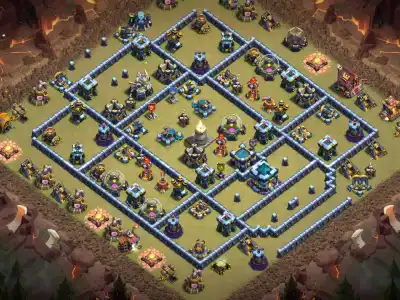










COC Bases: Best TH13 Defense Layouts (Copy Links)
Upgrade smarter with strong TH13 defense layouts made to protect your core, punish meta attacks, and reduce 3-star chances. Copy any base instantly with 1-tap links.
How to Choose the Best TH13 Defense Base
A TH13 defense base is built for broad everyday protection.
It should make Town Hall access, outside percentage, Battle Blimp value, air
routes and ground paths harder to combine into one simple attack plan.
The best TH13 defense layout for your village depends on the
attacks you face most often. A good layout should separate the Town Hall,
Eagle Artillery, Scattershots, Inferno Towers, Air Sweepers, X-Bows, defending
Heroes and traps so one entry does not remove the full defensive structure.
Use the layouts on this page as general defensive starting points. Compare
Town Hall placement, Eagle Artillery value, Scattershot separation, Inferno
Tower coverage, Battle Blimp routes, Queen Charge paths, outside percentage,
air-ground balance, trap distribution and back-end strength before choosing a
base. No TH13 layout can guarantee the same result against every attacker.
Balanced Air and Ground Defense
A TH13 defense layout should not focus only on air attacks, only on ground pushes, only on Town Hall protection or only on resources. It should create reasonable pressure against several common attack families.
Balance does not mean every defense is placed evenly. It means the base avoids one obvious route that removes the Town Hall, Eagle Artillery, Scattershots and back end together.
Separate High-Value Defenses
The Town Hall, Eagle Artillery, Scattershots, Inferno Towers, X-Bows, Air Sweepers and defending Heroes should not all sit inside one compact value zone.
One Battle Blimp, Queen Charge, Hero dive or central push should not remove every major defensive objective at the same time.
Use Defending Heroes Carefully
Defending Heroes can make Queen Charges, Hero dives, ground pushes and cleanup routes more expensive when they support meaningful defensive coverage.
Avoid placing every Hero where one entry removes them before the middle or back end of the attack begins.
Use Replay-Based Trap Logic
Traps should follow realistic troop, Hero and Siege Machine movement. Place them where attackers actually travel, not only where a gap looks available.
Review several defenses before changing the full layout. Repeated routes are more useful than one unusual replay.
What Makes a TH13 Defense Layout Different?
A TH13 defense layout is broader than a farming, hybrid, war, Legend League, anti-air, anti-2-star or anti-3-star base. It is useful when you want a general base that can handle everyday attacks without being built for one narrow goal.
This category should not be judged only by one successful defense. A practical defensive base should avoid repeated easy Town Hall routes, safe outside percentage, direct Battle Blimp value, weak air coverage, straight ground paths and an overloaded core.
Town Hall 13 defense is strongly shaped by the Giga Inferno, Eagle Artillery, Scattershots, Inferno Towers, X-Bows, Air Sweepers, defending Heroes and Battle Blimp routes. These features should work across different phases of the attack instead of sitting together in one easy value zone.
Different from Farming
Farming bases prioritize storage and resource routes first. A defense base may still protect loot, but it gives more attention to stars, destruction percentage and overall attack pressure.
Different from War
War bases are built for fully scouted attacks and battle-day goals. A general defense base should be easier to use every day and should not depend on one narrow war-only plan.
TH13 Defenses That Shape Base Design
Town Hall 13 base design should account for the Giga Inferno, Eagle Artillery, Scattershots, Inferno Towers, X-Bows, Air Sweepers, Clan Castle troops, defending Heroes and traps.
These defenses should create problems in different phases of the attack. If one opening removes the Town Hall, Eagle Artillery, both Scattershots, key Infernos and the strongest air coverage, the remaining layout may not have enough pressure for the follow-up.
Town Hall Giga Inferno
The TH13 Town Hall can punish grouped troops around the Town Hall section and influence how attackers commit spells, Heroes and Siege support.
Use this pressure as part of the layout, but do not rely on the Town Hall alone to carry the defense.
Eagle Artillery Placement
The Eagle Artillery should not always be removed with the Town Hall and both Scattershots from the same entry.
Keep long-range pressure available beyond the first phase of the attack so surviving troops still face damage in the middle or back end.
Scattershot Separation
Scattershots are important splash defenses at TH13. Placing both in one easy value zone can make the base easier for a planned push or Battle Blimp opener.
Separate them enough that attackers must choose which section to remove first.
Inferno and X-Bow Coverage
Inferno Towers and X-Bows should support both air and ground defense. Their modes should match the expected routes and the rest of the layout’s damage profile.
Review Inferno and X-Bow modes after copying a layout because incorrect settings can weaken the intended defensive plan.
Planning the Town Hall Position
Town Hall position affects star value, Battle Blimp routes, Hero pathing, Queen Charge entries, percentage control and the amount of defensive value available from one commitment. Central, offset and teaser-style placements can all work when the surrounding base supports the idea.
Central Town Hall
A central Town Hall can require attackers to pass through several defensive layers and spend important spells, Hero abilities or Siege support before reaching it.
Avoid creating one overloaded core where a single Blimp, Queen Charge or central push removes the Town Hall, Eagle Artillery, Scattershots and Infernos together.
Offset Town Hall
An offset Town Hall can pull attackers toward one side while strong defenses remain elsewhere.
Check whether one short Hero route, Queen Charge or direct Battle Blimp line can reach it too cheaply from the deployment edge.
Teaser-Style Town Hall
A teaser Town Hall encourages attackers to enter from a predictable side. That route should contain traps, defending Heroes, Clan Castle pressure or overlapping damage.
Without a clear punishment plan, the Town Hall may simply become an inexpensive first objective.
Town Hall and Back-End Separation
Reaching the Town Hall should not remove the complete defensive plan. Preserve meaningful air-targeting, splash, single-target and trap pressure in another section.
Using Defending Heroes in TH13 Defense
Defending Heroes can affect Queen Charge routes, Hero dives, Royal Champion paths, ground entries and cleanup timing. Their placement should support the layout’s main defensive routes instead of giving away free early value.
Support Important Sections
Defending Heroes can support the Town Hall route, Scattershot section, Inferno compartment, Eagle Artillery area or back-end defenses.
Hero pressure is strongest when attackers must fight through active defensive coverage at the same time.
Avoid One Hero Cluster
If every defending Hero sits in one area, one Queen Charge, Battle Blimp follow-up or ground entry may remove too much Hero value at once.
Spread Hero pressure so multiple defensive sections remain relevant during different attack phases.
Controlling Outside Percentage
A TH13 defense base should not leave too many buildings available for safe destruction. Easy outside percentage helps attackers build clean funnels and can make the Town Hall or core entry easier to plan.
- Cover selected perimeter buildings: avoid giving attackers a completely safe route around the village.
- Use storages as buffers: storage hitpoints can slow troops while nearby defenses continue firing.
- Avoid long unprotected rows: several outside buildings in sequence can create easy percentage and a clean funnel.
- Protect useful corners: corner buildings can add travel time, but prepared attackers may place cleanup early.
- Preserve interior structures: enough buildings should remain behind defenses so attackers must enter the base for meaningful destruction.
Planning against Battle Blimps
Battle Blimps can target the Town Hall, Eagle Artillery, Scattershots, Inferno Towers or a concentrated defensive section. Review direct and diagonal approaches from every deployment side before choosing a TH13 defense layout.
Separate Landing-Zone Value
One successful delivery should not remove the Town Hall, Eagle Artillery, both Scattershots, several major defenses and a simple path for the remaining army.
Cover More Than One Route
Seeking Air Mines, Air Bombs, Air Sweepers, the Tornado Trap and defensive towers should influence several realistic Blimp approaches.
Account for Protected Deliveries
Attackers may support a Blimp with spells, Hero abilities or equipment. Do not assume one trap or one Sweeper will stop every delivery.
Use Tornado Trap Delay
Place the Tornado Trap where its delay keeps the Blimp, delivered troops or a Hero group inside active defensive coverage.
Planning against Ground Attacks
TH13 ground attacks may use Queen Charges, Smash pushes, Yetis, Super Bowlers, Witches, Miners, Hog Riders, Royal Champion paths, Heroes and Siege Machines. A defense layout should avoid one straight route through every important objective.
Break Direct Defensive Lines
Do not place the Town Hall, Eagle Artillery, Scattershots, Inferno Towers, Clan Castle and back-end defenses along one simple ground route.
A ground push should need to redirect, split or spend additional support to reach the next important section.
Use Offset Compartments
Offset compartments can separate the main army from support troops or pull the push away from the strongest back-end defenses.
Avoid random wall openings that create easier access without a defensive reason.
Preserve Single-Target Pressure
Single-target Infernos, defending Heroes and protected core defenses should challenge Heroes and high-hitpoint troops at different stages of the attack.
Review Miner and Hog Paths
Miners and Hog Riders move between defensive targets. Place Giant Bombs, Spring Traps and Skeleton Traps according to likely target order rather than random gaps.
Planning against TH13 Air Attacks
Air attacks may include Electro Dragons, Dragons, Balloons, Lava Hound-style plans, flying Heroes and air-supported Siege Machines. A TH13 defense layout should preserve air-targeting pressure in more than one section.
Use Controlled Chain Spacing
Separate important defenses enough to reduce repeated Electro Dragon chain value. Avoid excessive spacing that leaves buildings isolated and easy to clean up.
Protect Air Defenses and Sweepers
One Hero entry should not remove an Air Defense, Air Sweeper, Inferno Tower and another major objective together.
Preserve Back-End Air Damage
Air Defenses, Inferno Towers, X-Bows, traps and defending Heroes should remain active after the first air section falls.
Review Balloon Paths
Balloons move between defensive targets. Place Air Bombs and supporting splash damage where Balloons are likely to gather or change direction.
Planning Air Sweeper Directions
Air Sweeper direction should be checked after every copy-link installation. A layout can look strong but still leave the main air or Battle Blimp route unpressured if both Sweepers point toward low-value sides.
- Cover attractive approaches: aim toward sides offering Town Hall, Eagle Artillery, Scattershot or core access.
- Influence Blimp paths: review direct and diagonal delivery routes, not only the shortest line.
- Support back-end air damage: push flying troops into areas where defenses remain active.
- Avoid wasted directions: pointing both Sweepers toward a low-value side may leave the real entry exposed.
- Use replay evidence: adjust directions when several attacks repeatedly use an uncovered air route.
Recommended Trap Principles for TH13 Defense Layouts
Trap placement should support the layout’s likely air, ground, Hero and Siege Machine routes. These ideas are starting principles rather than guaranteed combinations.
- Tornado Trap near active defenses: use its delay where nearby towers can continue attacking a Blimp, Hero or troop group.
- Seeking Air Mines on probable approaches: cover likely Battle Blimp, Dragon, Balloon and flying-Hero routes.
- Air Bombs on grouped flight paths: place them where Balloons or other flying troops are likely to gather.
- Giant Bombs on ground paths: position them where Miners, Hog Riders or support troops are likely to move between defenses.
- Spring Traps on important crossings: current Spring Traps target one qualifying troop, so place them where that disruption can affect movement or timing.
- Skeleton Trap modes: choose ground or air according to the Hero, troop or Siege route being defended.
- Preserve back-end traps: avoid committing every trap to the Town Hall or opening section.
How to Compare TH13 Defense Layouts
Do not choose a TH13 defense base only because it looks compact, symmetrical or complicated. Compare whether the layout gives balanced pressure against realistic air, ground and Siege routes.
- Inspect Town Hall access: determine whether a Hero or Siege Machine can reach it too cheaply.
- Review outside percentage: avoid giving attackers a safe route through half of the village.
- Check Eagle Artillery placement: one entry should not remove it with the Town Hall and several splash defenses.
- Check Scattershot separation: one push should not remove both Scattershots and the main core together.
- Inspect Battle Blimp routes: review direct and diagonal approaches toward the Town Hall and core.
- Check Air Sweeper directions: make sure they influence realistic air and Blimp approaches.
- Review ground paths: avoid one straight defensive line through the complete village.
- Review defending Hero positions: Heroes should support important routes instead of being removed too early.
- Inspect trap distribution: traps should cover several likely routes rather than one predictable entry.
- Review the back end: meaningful defensive damage should remain after the opening and Town Hall sections fall.
How to Use TH13 Defense Copy Links
Select a TH13 defense base copy link to open the design in the Clash of Clans Layout Editor. Confirm that every available building, defense, wall and trap has been placed before saving the layout.
After copying, review Town Hall placement, Eagle Artillery placement, Scattershot separation, Inferno Tower modes, X-Bow modes, Air Sweeper directions, Skeleton Trap modes, Clan Castle troops if used by your defensive setup, defending Hero positions and trap positions.
Check whether newly upgraded or previously unplaced buildings remain outside the layout. Missing buildings can change spacing, troop pathing, percentage control and defensive balance.
Confirm that the copied design is selected as the active defensive layout for the mode you are using. Saving a base in the editor does not always mean the correct defensive slot is active.
A working one-tap copy link makes installation easier, but it does not prove that the layout has undergone controlled testing or guarantee a defensive result against every TH13 army.
How to Review TH13 Defense Replays
Review several defenses before making major changes. One attack may show a mistake, but repeated attacks reveal structural weaknesses.
- Track repeated entry sides: note whether attackers keep choosing the same Town Hall, Blimp, Hero or ground route.
- Review average stars: look at repeated results instead of one highlight defense.
- Review destruction percentage: percentage helps compare defenses that give up the same number of stars.
- Check defending Hero value: identify whether Heroes are slowing attacks or being removed too early.
- Check back-end survival: identify which defenses remain active and whether they affect the final troops.
- Change one feature at a time: targeted adjustments make it easier to understand which change helped.
Common TH13 Defense Base Mistakes
- Creating an overloaded core: one Battle Blimp, Hero dive or central push may remove several major defenses together.
- Stacking Town Hall, Eagle and Scattershots: one entry may remove too much defensive value.
- Ignoring defending Hero placement: Hero pressure may be wasted or removed before it affects the attack.
- Grouping all Heroes together: one entry may remove too much defensive Hero value at once.
- Ignoring ground pathing: one direct route may carry the army through the complete village.
- Ignoring Air Sweeper directions: the base may leave the main air or Blimp route unpressured.
- Leaving excessive outside percentage: safe perimeter buildings can create easy funnels and destruction.
- Protecting only the Town Hall: attackers may collect percentage and defensive value elsewhere.
- Protecting only resources: the layout may become closer to a farming base than a general defense base.
- Stacking every air trap near the Town Hall: alternate air routes and the back end may receive little pressure.
- Placing traps randomly: traps should follow realistic troop, Hero and Siege Machine movement.
- Using outdated Spring Trap assumptions: Spring Traps target one qualifying troop rather than launching an entire group.
- Changing the full layout after one attack: repeated patterns are more useful than a single replay.
When Should You Adjust a TH13 Defense Layout?
Adjust the layout when several defenses show the same weakness. Examples include repeated Battle Blimp value, the same Hero entry, a direct ground path, a Sweeper bypass, early defending Hero removal, safe outside percentage or a weak final section.
Begin with one targeted change. Adjust an Air Sweeper direction, move one exposed defense, separate two high-value buildings, revise a wall opening, change an Inferno mode, adjust defending Hero placement or redistribute one trap group.
Review additional defenses after the change. Confirm that the adjustment reduces the original weakness without creating an easier route for another attack style.
Should You Rotate TH13 Defense Bases?
Rotation can help when repeated attacks use the same entry or when your current layout no longer fits the attack styles you are seeing.
Do not rotate automatically on a fixed schedule. A base that continues to create difficult attacks may only need a targeted setting, wall, Hero or trap adjustment.
How These TH13 Defense Layouts Are Reviewed
Layouts may be community-submitted or editorially reviewed for their Town Hall level, visible structure, defense-category relevance, image quality and copy-link availability. Review may include Town Hall access, Eagle Artillery placement, Scattershot separation, Air Sweeper direction, Blimp routes, ground paths, outside percentage, defending Hero value and back-end strength.
Publication does not automatically mean that a layout has undergone controlled battle testing against every TH13 strategy. Any layout specifically described as tested should be supported by documented defensive results and a clear testing process.
Read the layout review methodology for information about submissions, editorial checks, corrections and testing labels.
Return to the complete TH13 base layout guide to compare defense layouts with farming, hybrid, war, anti-air, anti-2-star and anti-3-star categories.
Browse this page to compare TH13 defense bases, Town Hall 13 defense layouts and available one-tap copy links. The best layout for your village is the design that balances Town Hall access, Eagle Artillery placement, Scattershot separation, Air Sweeper directions, trap routes, outside percentage, defending Hero pressure and back-end coverage against the attacks shown in your defense log. No TH13 defense base can guarantee the same result against every attacker.