
COC Bases: BH9 All Layouts (Builder Hall 9 Base Designs)
All Builder Hall 9 layouts in one place — defense, farming, trophy pushing, and balanced Builder Base designs for top-tier Builder Base competition.
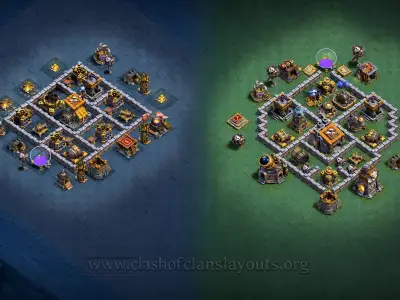
Builder Hall 9 Base Layout Guide
Builder Hall 9 brings more advanced two-stage attacks, stronger troop combinations,
and additional reinforcement options. A successful BH9 base layout
must prepare for ground and air Hero Machines, defense-targeting Hog Gliders,
powerful ground armies, and attackers who can adapt their strategy before entering
Stage 2.
BH9 is not simply about placing the strongest defenses around the Builder Hall.
Both stages need protected objectives, carefully planned entry routes, and enough
defensive variety to prevent one army composition from clearing the complete base.
The first stage should weaken the attacker, while the second stage should punish
the surviving troops, reinforcement choices, and Hero Machine.
BH9 Defense Layouts
BH9 defense layouts focus on limiting total stars and destruction across both stages. They use protected high-impact defenses, mixed ground and air coverage, and difficult objective routes to reduce the value attackers gain from one successful entry.
BH9 Trophy Layouts
BH9 trophy layouts are designed to make six-star attacks difficult. Stage 1 should remove troops and force ability usage, while Stage 2 should prevent surviving units and reinforcements from collecting easy additional stars around O.T.T.O’s Outpost.
BH9 Progression Layouts
Builder Base attackers do not steal resources from your storage buildings. Builder Gold is earned through attacks, while Builder Elixir is earned from defensive results. A progression layout therefore aims to limit stars and destruction while your defenses, troops, Hero Machines, and support buildings continue to improve.
BH9 Balanced Layouts
Balanced BH9 layouts combine anti-ground pressure, protected anti-air coverage, controlled objective access, and useful defensive strength on both stages. They are suitable for regular Builder Battles when your opponents use a wide variety of armies and Hero Machine choices.
What Makes Builder Hall 9 Different?
Builder Hall 9 expands both offensive and defensive possibilities. Defenders gain access to the Lava Launcher, while attackers can use Hog Gliders to move directly toward defenses and temporarily stun their targets. BH9 also unlocks a second Reinforcement Camp, giving attackers more options after they complete Stage 1.
These additions make single-purpose layouts less reliable. A base designed only to stop slow ground armies may struggle against defense-targeting Hog Gliders, while a layout with weak ground splash coverage may allow grouped troops to remain active for too long. Each stage should present a different challenge without creating an obvious weakness.
Lava Launcher Unlocks
The Lava Launcher targets ground troops with long-range splash attacks and leaves damaging areas on the battlefield. Its placement should cover routes where ground units are likely to remain grouped or stop to attack important buildings.
Hog Glider Attacks
Hog Gliders can move over walls, target defenses, and stun the building they reach. Layouts should avoid exposing important defenses along one simple route, because several Hog Gliders may disable and remove them in sequence.
Second Reinforcement Camp
BH9 unlocks a second Reinforcement Camp, allowing attackers to bring another reinforcement troop slot into Stage 2. The second stage should be prepared for a more flexible and better-supported army than at lower Builder Hall levels.
B.O.B Tasks Become Available
Reaching BH9 unlocks the tasks required to obtain B.O.B as an additional Home Village Builder. Progress includes Gear Up upgrades, troop and defense levels, and combined Hero Machine levels, making balanced account development increasingly important.
How to Place the Lava Launcher at BH9
The Lava Launcher should control an important ground route rather than being placed only because a location looks central. Its long-range splash damage is most useful when troops remain within the affected area while attacking buildings or moving between compartments.
Protect it from fast defensive targeting and easy Hero access. If attackers can reach the Lava Launcher immediately from the deployment edge, it may be destroyed before it applies enough pressure to the rest of the army.
Use It in Stage 1 When
Consider placing the Lava Launcher in Stage 1 when grouped ground armies regularly clear the area with several surviving troops. Its splash damage can weaken the starting army and make Stage 2 more difficult to complete.
Use It in Stage 2 When
Consider placing it in Stage 2 when surviving ground troops and reinforcements collect easy additional stars. A protected Lava Launcher can damage grouped units while they approach O.T.T.O’s Outpost.
Cover Predicted Ground Routes
Arrange walls and building targets so ground troops move through areas covered by the Lava Launcher. Avoid aiming its main value toward a section that attackers can easily avoid.
Protect Its Close Approach
Long-range defenses can become vulnerable when attackers reach them directly. Use nearby defenses, walls, traps, and supporting buildings to make a close approach dangerous.
How to Defend Against Hog Gliders
Hog Gliders create a different pathing challenge because they move over walls and target defenses. A BH9 layout should not arrange several important defenses in a predictable line from the deployment edge toward the center.
After landing, the Hog Rider continues as a ground unit. This means the layout should prepare for both the initial flying approach and the ground movement that follows. Protected defenses, trap routes, and separated defensive targets can reduce the value of repeated stuns.
Separate Important Defenses
Avoid placing every high-impact defense close together. If one group can be reached through the same Hog Glider approach, attackers may stun and remove several valuable buildings without changing their plan.
Avoid Straight Defense Lines
A line of defenses leading inward can create a natural route for defense-targeting troops. Offset important buildings so attackers must split deployment or move through different sections of the stage.
Support the First Target
The defense most likely to be targeted first should remain covered by nearby buildings. Attackers should not be able to stun and destroy it without taking meaningful return damage.
Plan the Ground Follow-Up
Once Hog Gliders land, walls, traps, and ground defenses influence their next route. Use compartments and building placement to separate the resulting Hog Riders from supporting troops and Hero Machines.
Preparing for Two Reinforcement Slots
At BH9, attackers reaching Stage 2 can use two reinforcement slots. This allows them to add more support, replace missing troop roles, or select units that directly counter the second-stage layout. Stage 2 should therefore avoid depending on one predictable defensive trick.
Use Mixed Defensive Coverage
Combine ground control, anti-air coverage, splash damage, and protected single-target damage. A stage that relies entirely on one damage type may be easier to counter with the additional reinforcement choice.
Protect the Stage 2 Opening
Do not give reinforcements and surviving troops several free buildings when they enter Stage 2. Apply pressure early so the attacker cannot create a perfect funnel before approaching the Outpost.
Avoid One Obvious Counter
Review whether one troop type can safely remove the most important defense in Stage 2. Spread defensive responsibilities so one reinforcement selection does not unlock the complete layout.
Force Reinforcement Decisions
A strong second stage should make the attacker choose between protecting the Hero Machine, dealing with air defenses, controlling ground threats, or reaching the Outpost. Avoid allowing one reinforcement group to solve all of these problems together.
Balancing Stage 1 and Stage 2 at BH9
BH9 attackers have more developed armies, two Hero Machine options, and two reinforcement slots. This makes stage balance especially important. A weak Stage 2 may provide several easy stars even after Stage 1 causes significant losses.
Stage 1 should damage the starting army, force abilities, and make complete destruction expensive. Stage 2 should challenge the remaining force immediately and remain effective against troop swaps, reinforcements, and a possible Hero switch.
Stage 1: Weaken the Starting Army
Protect the Builder Hall, cover likely entry routes, and force attackers to spend troop and Hero abilities. Avoid allowing one approach to reach the objective and several high-impact defenses together.
Stage 2: Deny the Final Stars
Protect O.T.T.O’s Outpost and make the opening deployment difficult. Stage 2 should remain useful against surviving troops, two reinforcement slots, and either Hero Machine.
BH9 Stage 1 Layout Priorities
The first stage faces the attacker’s full starting army and chosen Hero Machine. It should provide enough defensive pressure to reduce the strength carried into Stage 2 without leaving the second stage underprotected.
Protect the Builder Hall
Avoid placing the Builder Hall near an easy deployment route. Attackers should need to pass through meaningful defensive coverage before reaching it or gaining access to the central area.
Force Ability Usage
Create enough early pressure to encourage attackers to use troop and Hero abilities during Stage 1. Fewer available abilities make the surviving army less flexible in Stage 2.
Prevent Easy Defensive Chains
Do not arrange important defenses so Hog Gliders or other defense-targeting troops can move through them in a predictable sequence. Offset targets and protect likely first choices.
Limit Safe Percentage
Outside buildings can waste time and influence troop movement, but too many unprotected structures provide easy destruction. Keep valuable outer targets within useful defensive range.
BH9 Stage 2 Layout Priorities
Stage 2 may face surviving troops, a different Hero Machine, and two reinforcement selections. It should have a difficult opening, protected high-impact defenses, and more than one layer of protection around O.T.T.O’s Outpost.
Protect O.T.T.O’s Outpost
Place the Outpost where attackers must enter defensive coverage to reach it. Avoid aligning it with an open deployment route or several other valuable targets that can be reached through one approach.
Prepare for a Fresh Hero Machine
An attacker may switch Hero Machines before beginning Stage 2. Include both ground control and protected anti-air coverage so neither the Battle Machine nor Battle Copter receives a completely safe opening.
Protect Key Stage 2 Defenses
Do not expose the first important defense where reinforcements can remove it immediately. Use surrounding buildings and overlapping coverage to make early defensive removal costly.
Avoid Repeating Stage 1 Weaknesses
If Stage 1 is vulnerable to one approach, Stage 2 should not provide the same route and defensive pattern. Attackers can adapt their remaining troops and reinforcements after seeing how the first stage behaves.
Choosing the Right BH9 Layout
Select a BH9 layout by reviewing complete defensive replays rather than judging only the final percentage. Track the troop composition, selected Hero Machine, reinforcement choices, first defense targeted, and the amount of army strength that survives Stage 1.
If attackers frequently clear Stage 1 with most of their army intact, improve first-stage pressure. If they barely complete Stage 1 but still gain several additional stars, strengthen the second-stage opening and Outpost protection.
Choose Stronger Ground Control When
Improve ground splash, trap routes, wall compartments, and Lava Launcher coverage when grouped ground armies repeatedly survive too long or move through the same route.
Choose Stronger Defense Protection When
Separate and support important defenses when Hog Gliders repeatedly stun and remove them in sequence. Avoid making one deployment line effective against several high-value targets.
Choose Stronger Air Coverage When
Improve protected anti-air coverage when the Battle Copter or flying troops receive safe approaches. Review both stages for areas that depend too heavily on walls and ground-only defenses.
Choose a Stronger Stage 2 When
Strengthen Stage 2 when two reinforcement slots provide attackers with an easy answer to the remaining defenses. Improve opening pressure, mixed coverage, and the route toward O.T.T.O’s Outpost.
How to Use BH9 Copy Links
Tap an available copy link to open the selected BH9 layout directly in Clash of Clans. Review both stages in the Layout Editor before saving or activating the design. Confirm that all required buildings, walls, traps, and Stage 2 structures are placed correctly.
After copying a layout, compare its defensive distribution with your own upgrade levels. You can move eligible defenses between stages, reposition traps, adjust wall openings, and relocate outside buildings according to the weaknesses shown in your defense log.
BH9 Two-Stage Layout Checklist
- Review Lava Launcher coverage: make sure it controls a likely ground route and cannot be removed safely from the deployment edge.
- Check Hog Glider paths: avoid placing important defenses in one predictable line that can be stunned and destroyed in sequence.
- Prepare for two reinforcement slots: Stage 2 should remain effective against more than one supporting troop choice.
- Protect both objectives: neither the Builder Hall nor O.T.T.O’s Outpost should have a lightly defended direct route.
- Check Hero Machine options: both stages should contain useful pressure against the Battle Machine and Battle Copter.
- Balance defensive strength: avoid placing nearly every high-impact defense in one stage.
- Protect first-target defenses: likely opening targets should receive support from nearby defenses.
- Inspect outside buildings: use them to affect time and pathing without offering excessive free destruction.
- Place traps on expected routes: trap positions should match the movement encouraged by your buildings and walls.
Common BH9 Base-Building Mistakes
- Calling BH9 the highest Builder Hall: Builder Hall 10 is now available, so BH9 should be described as an advanced level rather than the maximum.
- Exposing the Lava Launcher: attackers may remove it before its long-range ground damage affects the main army.
- Using poor Lava Launcher coverage: placing it where ground troops rarely travel reduces its defensive value.
- Aligning important defenses: Hog Gliders may follow a simple route through several defense targets.
- Ignoring the second reinforcement slot: Stage 2 may face a more complete and adaptable army than at BH8.
- Designing for only one Hero Machine: attackers can select or switch between ground and air Hero options.
- Overloading Stage 1: a very strong first stage does not help enough when Stage 2 provides easy additional stars.
- Using identical weaknesses on both stages: attackers can adjust troops and reinforcements before beginning the second stage.
Tips for Builder Hall 9 Success
- Review complete replays: track how many troops, abilities, reinforcement choices, and Hero hit points continue into Stage 2.
- Test Lava Launcher placement: move it when attackers regularly avoid its coverage or remove it too early.
- Track Hog Glider targets: identify which defense is repeatedly stunned first and improve support around that area.
- Prepare Stage 2 for flexibility: two reinforcement slots allow attackers to correct multiple weaknesses in their surviving army.
- Change one area at a time: small adjustments make it easier to determine which modification improved the result.
- Progress toward B.O.B: balance troop, defense, Gear Up, and Hero Machine upgrades instead of focusing on only one requirement.
- Upgrade both stages: strong placement is more effective when important defenses on both layouts can deal meaningful damage.
When Should You Change Your BH9 Layout?
Consider changing your BH9 layout when several attackers use the same Hero, reinforcement combination, Hog Glider route, or Lava Launcher approach to gain repeated high-star results. A repeated pattern is more useful than one unusually strong attack when deciding whether a layout has a structural weakness.
Begin by changing the affected section instead of replacing both stages immediately. Move an exposed defense, adjust the Lava Launcher position, separate Hog Glider targets, change a trap route, or strengthen the Stage 2 opening. Review several additional defenses before deciding whether the complete design should be replaced.
Explore the layouts on this page to choose a BH9 base layout suited to advanced two-stage defense, trophy pushing, or regular progression. After activating a new Builder Hall 9 Clash of Clans base, review its performance against Hog Gliders, ground armies, air attacks, Hero Machine switches, and two-slot reinforcement strategies before making adjustments.