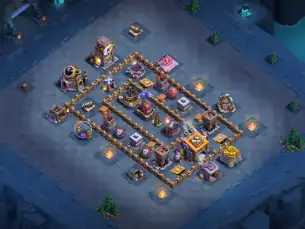
BH9 Builder Hall Base with Central Core Compartments

Latest Reviews
Strategy Explanation
This BH9 setup uses a compact central core with several small compartments around it rather than one large open box. The Builder Hall sits near the middle, protected by walls and surrounded by multiple defenses, which makes direct access less convenient for simple Boxer Giant or PEKKA-style entries. The layout also avoids lining everything up in a straight path, so troops are more likely to split once the first layer is opened.
The Crusher is placed in the lower core area, while the Multi Mortar and Roaster are offset from each other instead of stacked together. That matters because an attacker cannot get all of the major splash value from one clean push without stepping deeper into the base. The Mega Tesla on the left side and the Giant Cannon toward the upper side create pressure from different angles, so a ground army entering from one edge is still being hit by heavy single-target or burst damage from another compartment.
Air pathing is also a clear part of the defensive idea. The Air Bombs and Archer Towers are not all sitting beside the Builder Hall, which spreads anti-air coverage across the base. Baby Dragon and minion cleanup attacks do not get an easy sweep through one side because the defenses are staggered and the outside ring is not full of free buildings. If you want to copy this one, the value is in the awkward approach angles more than in one dominant kill zone.
Strengths
The biggest strength here is how the base makes attackers commit deeper before they can lock onto the Builder Hall. Several key defenses cover different lanes, and the compartment spacing makes clean path control harder than it first looks.
- Protected Builder Hall: It is not exposed on an edge, so quick percentage hits or easy snipes are less likely.
- Split defensive coverage: Mega Tesla, Giant Cannon, Crusher, Roaster, and Multi Mortar are spread enough to avoid giving one obvious entry point.
- Awkward ground pathing: Small compartments and offset walls can make Giants and other tank units walk unevenly instead of flowing directly into the center.
- Reasonable anti-air spread: Air-targeting defenses are placed across multiple sides, which helps against light air troops trying to circle the base.
Ground Attack Pathing
Against ground armies, the main question is whether the attacker can hold troops together through the first two layers. Boxer Giants sent in with supporting damage units may start well from a side with fewer immediate point defenses, but the layout tries to break that momentum with compartment turns and crossfire from the center. The Crusher in the lower interior is especially useful because it punishes troops that enter too directly from the bottom side.
PEKKA carts or stronger smash-style Builder Base attacks can still make progress if they get a straight opening into the core, but they do not get ideal value everywhere at once. The defense spread means a successful attack usually needs good troop timing rather than a simple drop-and-watch approach.
Air Attack Considerations
This base is not built as a pure anti-air shell, but it does have enough spacing to make air attacks work for their percentage. The Roaster is placed inside the structure rather than on an outer edge, which helps it stay active while air units move around the center. Archer Towers and Air Bombs covering different lanes also reduce the chance of one clean collapse point.
That said, if an attacker can trim outer buildings carefully and approach from the angle that reaches air defenses in order, this layout may still be manageable for a disciplined Baby Dragon plan. It is stronger against sloppy air deployment than against fully planned air pathing.
Compartment Value and Core Pressure
The best feature of this layout is not one isolated defense but the way the compartments force staggered engagements. Troops that open the first wall do not immediately get everything. They still need to step into the Builder Hall zone while being covered by nearby defenses from other pockets. That makes the center feel busier than the footprint suggests.
Because the core is active from multiple sides, this design is useful for players who want a balanced BH9 home setup rather than a trap-heavy gimmick. It gives real defensive interaction, keeps the Builder Hall meaningful to reach, and makes careless pathing mistakes expensive.
Best Use for This BH9 Setup
This works best as a general BH9 base for everyday defense where you want a centered Builder Hall and balanced coverage against both ground and air. It is practical, compact, and easy to read for your own adjustments if you want to shift a defense or test a different wall segment later.